Assets

Somnium – (Late) 2nd Update

Here’s another late update! (oopsie)

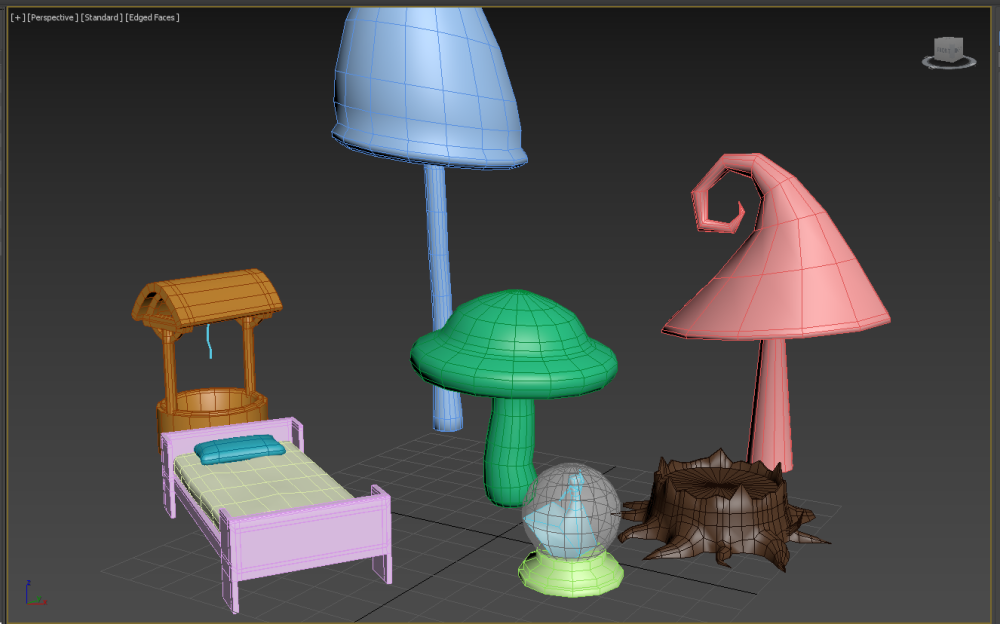
During the second week of production i created some asset for the game. Since Olivia is walking through her dreams, we wanted to fill the world with objects that are weird and out of place. As well as objects that represents Olivia as a character.

When creating the first batch of assets I would just look at an image of an object I found online and try to recreate that thing. This might not have been the smartest choice since we were very early in development, and we didn’t really know what we wanted in the game. So some assets like the well and the stump ended up not getting used at all. The mistake I did was that I was so eager to create assets for the game that I didn’t really take into consideration that we might want to create some concept art first.

Our workflow was chaos in the beginning of the project since we really hadn’t decided on how we would do things at this point. But now we always do concept art first and then discus on what to actually put time into creating.

assets

Holy shit more blog updates!?

Somnium – (Late) 1st Update

So ok, I actually have no idea which production week we are currently in. But here comes my first update on what I’m currently working on for our game Somnium.

(Update)

This is what i worked on during the beginning of the project. Our main character Olivia needed some walking animations, and it was up to me as lead animator for this project to make them! Our plan at this point was to have two different versions of her walk, one where she was walking in the good dream and one version for the bad dream. The difference between them where that one would play when she was feeling happy and safe, and the other one when she was feeling unease and scared.

Here’s what the first version of her scared walk looks like:

ezgif.com-video-to-gif

Garbage I know. But at least it was something.

(Update)

Since this was an animation I created at the beginning of the project, we weren’t sure if it was ever going to be used. Turns out it wouldn’t, haha.

But no worries! The animation was shit anyway and way to slow! I learnt from my mistakes and the future animation updates will be way more awesome for me to show you.

/Anton out.

So much death

Flight of the Giraffa – Final Update

The time has come, it’s the day before final and I’m tired as fuck. This week I finished the final art assets and animations for the game, making it almost one hundred percent complete. The only thing left now is code writing and bug fixing. There really is so much more stuff that I wish we had time to implement into the final version of the game, but I’m still happy with what we ended up with 🙂

Anyway, you’re probably wondering why I named this post ‘So much death’. That’s because some of the final animations we needed for our game were death animations. I know we’re only supposed to write about one artifact. But seeing how I animated the same thing three times for three different assets, I thought that I might as well showcase all of them.

I started with the animation that would take the longest time to complete. In this case it would be the animation for when the player dies, because I wanted it to be a little more gruesome when compared to the alien ones. I knew that I wanted it to contain blood or something, so I thought it would be fun to see the avatar explode from the inside out. So when I started with the animation process in Photoshop, I began to split our poor giraffe into pieces. I used the lasso tool to select parts of the body and separate them from the rest. I then moved those parts further away and made them smaller, while at the same time adding some splashes of blood here and there. I repeated this process until almost everything of the main body was gone. For the jet-pack I created a small explosion that’s expanding with each frame and slowly fading into smoke. This was actually a really fun animation to create, and here is the end result:

ginny death

ginny_death

This time you’re probably wondering where the head is. We actually decided that it would look more fun if the head didn’t explode, but instead came of and slowly drifted away when the player died. So that’s why no animation was needed for it.

When I created the death animation for the enemies in the game I pretty much went through the same process. What I did different was to add a few frames of anticipation in the beginning of their animation. I also made each of their explosion the same color as themselves to get some variation.

Here’s what they look like:

                          enemy1 death             enemy2 death

But with that this (probably) will be my last update on the game. So thanks for reading and stay awesome! 😀 Nordling Out.

The sneaky fire tail

Flight of the Giraffa – Update 5

Hello and welcome to yet another blog post. The beta-period is over and everyone is now working hard trying to get their games ready for the final play-test. So one of the things I’ve been working on is yet another animation for the game. More specifically it’s the tail of fire that the meteors in our game will be having. So the tail I’ve been working on is the final asset that the meteor needs in order to be complete.

During the beta play-test the meteors in the game only had their exploding animation. They looked extremely boring when only tumbling through space waiting to get blown-up by the player. So I decided it was time to give them their final touch.

When I started to think of how I was going to animate the fire tail, I had two ideas.

The first one was to animate it like I animated the projectiles for the game, so it would look like they had a fireball effect to them. Meaning that there would be fire moving from the sides of the meteor that’s making its way down to the end of the tail.

My second idea was to make the fire move like the body of a snake. And since I already had animated a fireball, I thought doing a snake-tail would be much more fun.

The first step was to draw the basic shapes for the tail, and later on just choose some colors for it. The tricky part came when I started to animate it. I just couldn’t get the movement right. It didn’t want to move like a snake at all! So I searched on Google for some gifs on snakes to use as reference, and found the perfect gif to help me.

This one:

snake_preview


I placed the frames of the gif in Photoshop and removed 2/3 of all the frames since I only needed ten for my animation. Then I simply drew ten frames of fire that moved along the snakes movement and voilá! So here’s what the final animation looks like.


www.GIFCreator.me_DN6MYy

I actually think it looks pretty dope!

And here’s the sprite sheet that will be used and place behind the meteor in-game:

firetail

I spent about 3 hours on this animation, which is a lot faster than any other of the animations I’ve done. But I guess that’s not surprising seeing it as how I’m finally pretty used to animating in Photoshop.

But that’s it for this week! Thanks for reading and bye!

ezgif.com-rotate

Tiling the asteroid!

Flight of the Giraffa – Update 4

Hello!

This will be the fourth blog post about our space shooter project. If you want more information about previous updates, please check out some earlier blog posts!

This time I will talk about one of the obstacles I’ve been working on for the game, the asteroid. Since the gameplay in our game is pretty straightforward, we thought that the game would be more interesting if the player needed to navigate through the level in some way. Up until now we have only had enemies spawn and attack you. This made it so that if the player felt like it, only could stand in one spot and shoot incoming enemies. So in order to make the gameplay more diverse and actually have something that looks like a level, we choose the incorporate the asteroids. They will simply work like big chunks of blocks coming in and blocking a section of the level off so that the player will need to navigate around it.

They will be tile-based in the same way that the enemies are. So when I started working on the art for them, the first step was to decide the size of each “tile” that the asteroid would have. I made each tile about the same size as each of the enemies (130 by 130 pixels), this way they would fit better in with the system the programmers use to load the enemies. I figured that it would be smartest to construct the asteroids in-game by loading in different tiles that simply would fit together, like squared puzzle pieces.

Since there only would be nine pieces in total needed, I created a grid in Photoshop that was 3 by 3, where each section was 130 by 130 pixels big. I started drawing everything gray, and simply continued by making all of the corners and the middle part.

Here’s how all the individual tiles turned out:

all the tiles

And here’s how they look when put together:

asteroid-tiles

The reason for their square design is just so that they could be better implemented into the game. It makes things like coding the hit-box and implementing into the tile system easier.

The difficult part about making these was that everyone needed to be able to merge seamlessly with one another. Luckily I have dealt with this problem before when I did the background for the game, so yet once again I abused the clone stamp tool in Photoshop to make them all smoothly merge into each other.

What I like about the asteroid-tiles is that they now are capable of creating huge obstacles in the game, which I hope will be a fun gameplay element 🙂

That’s it for this update! Thanks for reading!
Splosion in motion

Flight of the Giraffa – Update 3

So for my third post I’m going to talk about an animation I’ve created during this week. This animation didn’t actually take as much time as the one I wrote about in my first update, even thou it’s a little more complex. Probably because this time around I had gotten used to using the frame animation in Photoshop. The entire process for this artifact took me about 7 hours, which is about the time I anticipated.

In our game there is a specific thing that the player needs to do in order to obtain a power-up. That thing is to shoot down incoming meteors that has traversed from distant galaxies, bringing with them god knows what. Anyway, this brings me to one of the things I have been working on this week, the animation for when the meteors in the game explodes.

When I designed the meteors I didn’t want them to just be gray rocks that easily could melt into the background and potentially be ignored. So to make them ‘pop’ a bit more I made them consist of mostly glowing lava, surrounded by a small layer of rocks. I was really pleased with how the design turned out, and I actually got a little bit of inspiration to their design from some levels in Super Mario Galaxy.

When I got around to animating the meteor I actually had a lot of fun, at first. I realized like two frames in that this would take quite some time to finish. This mindset made me put the animation on hold for a day while I worked on other assets. Eventually I continued with the animation and made it a total of 12 frames. Since the animation is of a floating lava-rock that explodes, I used a reference picture that showed a version of how an explosion could look to help me on the way.

This is how the sprite sheet for the animation turned out:meteor_animation

For each frame I started with the line work and continued with coloring it. The hard part for me was to make the explosion that occurs in the middle to look consistent in every frame. But I think that the end result looks like it will work pretty good for our game. I’m most pleased with how the rocks on the meteor look when they are broken apart by the force that occurs at the center when it explodes.

This is a rendition of how the meteor looks in motion:

Meteor gi

That’s all for this week, see ya in the next post!

Creating a seamless background

Flight of the Giraffa – Update 2

Yet another week has flown by, and even more assets have been implemented in to the game. This week I had to create a background for our game. We wanted the game to have a scrolling background so that the player will feel the movement when flying through space.

When creating the background for the game, there were a few things I had to keep in mind. Firstly, the game takes place in space. So it wouldn’t make much sense if the background only showed a small portion of space, so when I designed it I had to incorporate the feel of distance in the picture. To do this I added a lot of stars and galaxies in the picture. The plan to make the atmosphere of the game feel as much as space as possible is to have it pan very slowly in the background.

The second thing I kept in mind when creating it was to not make it “pop” so much. By this I mean that I didn’t want it to distract the player from the action. So I had to make something that would be pleasant to look at and at the same time not draw the player’s attention to much.

This is how the background I made will look in the alpha-stage of our game:

game_background

The hard part about this was to make it seamless. This means that when the background is slowly panning, eventually it will have to loop. So the transition between the left side of the picture and the right side of the picture will have to be seamless in order for the pictures to flow into each other.

So to do this I used the clone stamp tool in Photoshop. I took the entire picture, copied it so I had two of the same picture next to each other. Then by simply using the clone stamp tool I started to remove the clear seam that was separating the pictures, until there was no seam left.

So this is what the background looks like when you loop it:

loop

(Now you can even see the big dipper! :))

This background will work for our alpha, but there is one thing I plan to do when the game moves into the beta-phase. I have some of the stars placed on different layers in the file, so the plan is to separate them from the background and have them moving on a different layer that scrolls faster while in game. This will hopefully help make the game feel more dynamic.

That’s all for this week!

Animating for our Space Shooter

Flight of the Giraffa – Update 1

We are now a couple of weeks into our space shooter projects. My team and I over took the concept document for this game from another team, and our task is now to simply create the game in all of its intended beauty.

In Flight of the Giraffa you play as Ginny, a heroic giraffe who’s been abducted by aliens together with her brother. After being subjected to all kinds of alien experiments, she gains the ability to fire projectiles from in between her horns. She is now fighting back trying to find her lost brother who’s being held captive somewhere amongst the alien fleet.

I have the role as Game Designer in this project and I have up to this point been working a lot on writing our Game Design Document (GDD) as well as doing some art assets for the game. So the artifact from last week I wanted to write about is the projectiles I made that Ginny will be shooting. I put roughly about 6-7 hours in total into creating these, which is way longer than I originally anticipated.

I started by sketching up a fireball like projectile, since I thought that I a fireball was something I later on would be able to animate. The other reason to why I choose this design was because I thought it looked really cool, and I also think it will feel really satisfying to just take down enemies with it.

sketch

Now came the time to polish it and create an animation for it, and since I really haven’t worked with 2D animation in Photoshop before, this could go both ways. The reason for me working in Photoshop so much is just because that’s what we mostly use in the 2D Graphics course. In order to make it so that it would fit in with the rest of the assets in the game, the lead artist in our group Theo Bengtson told me to give it thick outlines and bright, simple colors. And I’m pretty happy with how it turned out, it actually looks like something we could use 🙂

Projectile Sprite Sheet

The reason for this asset taking so much time was because animating in Photoshop when you haven’t done it before is a real pain in the butt. I had to scrap and redo everything sometimes because the timeline function is really screwed me over. But trial and error has finally made me capable of animating in Photoshop, so for the next asset it will hopefully go smoother. See you next week!

Projectile animation